本文共 12368 字,大约阅读时间需要 41 分钟。
Ubuntu 14.04 上安装V-rep 3.4.0
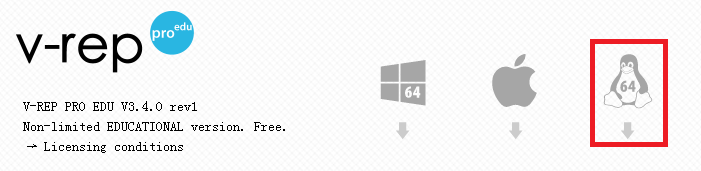
进入下载Linux版本的V-rep(注意V-rep 3.4.0只有64位的版本,因此操作系统也要与之对应,Ubuntu 32位系统就无法运行V-rep 3.4。如果想使用以前的V-rep版本,可以进入下载)
将下载的压缩文件解压后放到合适的位置,进入该目录下,执行sh脚本文件打开V-rep程序:
./vrep.sh
VREP与ROS的连接主要有三种方法:
- The RosInterface: RosInterface是V-rep官方推荐的用来跟ROS通信的插件(We highly recommend you to first try your hands on the RosInterface, since this is the most flexible and natural approach)
- The ROS plugin skeleton: 可以让用户实现特定功能的ROS插件框架(This represents a skeleton project that can be used to create a new ROS plugin for V-REP / create your own specific ROS plugin for V-REP. e.g. to support ROS messages for a specific robot)
- ROS interfaces developed by others: 其他非V-rep官方支持的通信接口,比如.
RosInterface
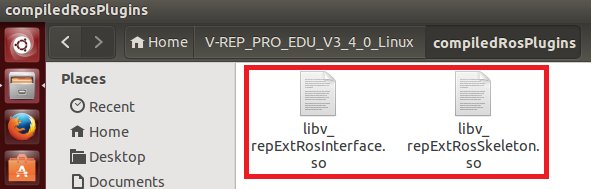
将VREP安装路径下的compiledRosPlugins文件夹中的libv_repExtRosInterface.so或libv_repExtRosSkeleton.so库复制到上层目录(VREP安装目录)中:
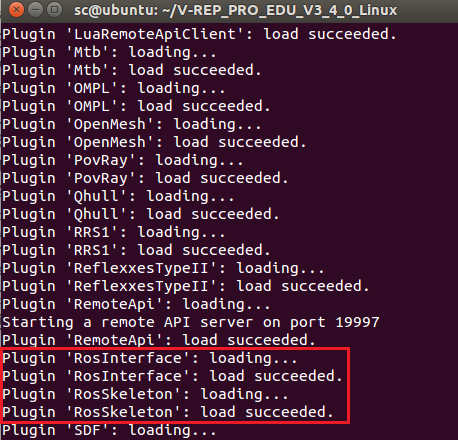
然后在终端中运行roscore开启ROS master,接着执行vrep.sh脚本打开VREP,打开过程中会导入插件。可以看到RosInterface插件已经成功加载:
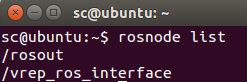
开启一个新终端,输入rosnode list查看运行的ros节点。可以看到除了ros master以外vrep_ros_interface也成功运行:
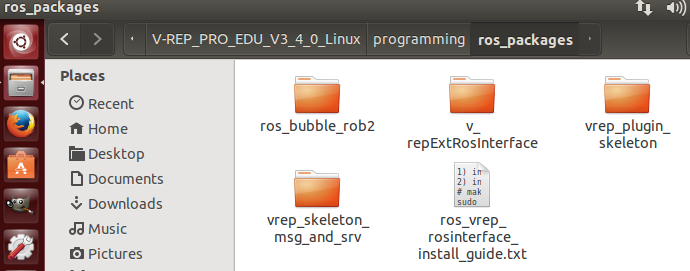
如果插件没能成功导入(我使用的ROS Indigo版本没遇到这种情况,但是ROS Kinetic会出错),则需要自己重新编译库文件。编译所需的几个package位于VREP安装目录的programming/ros_packages下,将其复制到自己的catkin_ws/src中,用catkin工具进行编译。具体步骤可以参照帮助文件中的ROS tutorial - Indigo页面或者文件夹中的ros_vrep_rosinterface_install_guide.txt安装说明。编译成功后将生成的.so库文件复制到V-rep安装目录中即可。
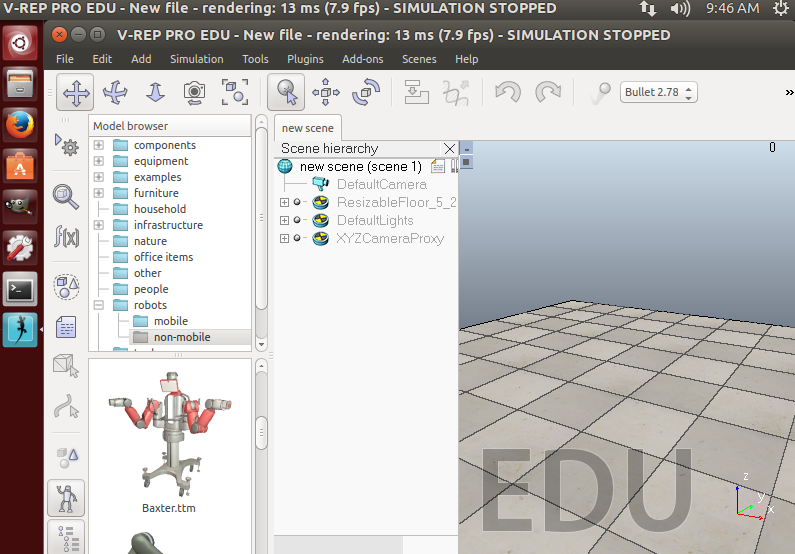
下面看一个简单的例子。在场景中选择一个物体添加一个non-threaded脚本,这个脚本会发布仿真时间然后自己订阅它,并且还会发布坐标变换消息:


function subscriber_callback(msg) -- This is the subscriber callback function simAddStatusbarMessage('subscriber receiver following Float32: '..msg.data)endfunction getTransformStamped(objHandle,name,relTo,relToName) -- This function retrieves the stamped transform for a specific object t=simGetSystemTime() p=simGetObjectPosition(objHandle,relTo) o=simGetObjectQuaternion(objHandle,relTo) return { header={ stamp=t, frame_id=relToName }, child_frame_id=name, transform={ translation={x=p[1],y=p[2],z=p[3]}, rotation={x=o[1],y=o[2],z=o[3],w=o[4]} } }endif (sim_call_type==sim_childscriptcall_initialization) then -- The child script initialization objectHandle=simGetObjectAssociatedWithScript(sim_handle_self) objectName=simGetObjectName(objectHandle) -- Check if the required RosInterface is there: moduleName=0 index=0 rosInterfacePresent=false while moduleName do moduleName=simGetModuleName(index) if (moduleName=='RosInterface') then rosInterfacePresent=true end index=index+1 end -- Prepare the float32 publisher and subscriber (we subscribe to the topic we advertise): if rosInterfacePresent then publisher=simExtRosInterface_advertise('/simulationTime','std_msgs/Float32') subscriber=simExtRosInterface_subscribe('/simulationTime','std_msgs/Float32','subscriber_callback') endendif (sim_call_type==sim_childscriptcall_actuation) then -- Send an updated simulation time message, and send the transform of the object attached to this script: if rosInterfacePresent then simExtRosInterface_publish(publisher,{data=simGetSimulationTime()}) simExtRosInterface_sendTransform(getTransformStamped(objectHandle,objectName,-1,'world')) -- To send several transforms at once, use simExtRosInterface_sendTransforms instead endendif (sim_call_type==sim_childscriptcall_cleanup) then -- Following not really needed in a simulation script (i.e. automatically shut down at simulation end): if rosInterfacePresent then simExtRosInterface_shutdownPublisher(publisher) simExtRosInterface_shutdownSubscriber(subscriber) endend 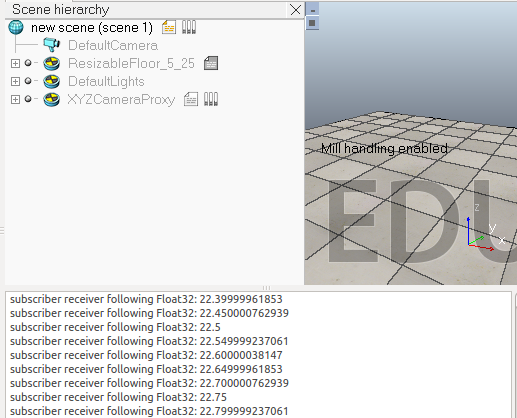
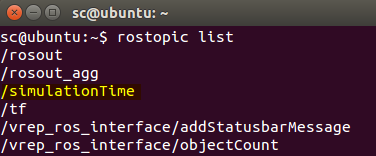
终端中输入rostopic list指令查看话题:
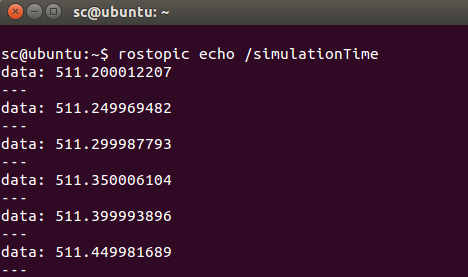
为了查看消息的内容,可以输入:
$ rostopic echo /simulationTime
脚本中主要用到下面几个函数:
- simExtRosInterface_advertise

- simExtRosInterface_subscribe

- simExtRosInterface_publish

- simExtRosInterface_sendTransform

rosInterfaceTopicPublisherAndSubscriber
在V-rep自带的例子中还有一个场景模型"rosInterfaceTopicPublisherAndSubscriber.ttt",脚本代码中会发布视觉传感器捕获的图像信息到/image话题上,同时会自己订阅这个信息并显示出来。
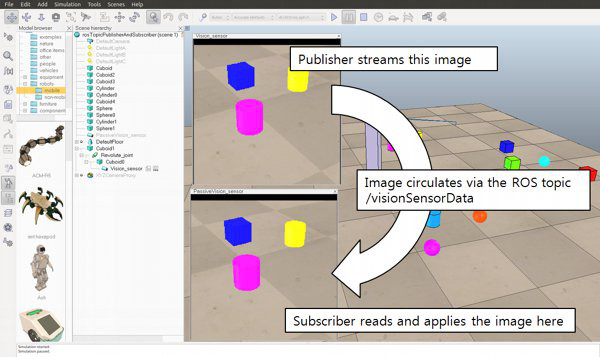
-- This illustrates how to publish and subscribe to an image using the ROS Interface.-- An alternate version using image transport can be created with following functions:---- simExtRosInterface_imageTransportAdvertise-- simExtRosInterface_imageTransportPublish-- simExtRosInterface_imageTransportShutdownPublisher-- simExtRosInterface_imageTransportShutdownSubscriber-- simExtRosInterface_imageTransportSubscribefunction imageMessage_callback(msg) -- Apply the received image to the passive vision sensor that acts as an image container simSetVisionSensorCharImage(passiveVisionSensor,msg.data)endif (sim_call_type==sim_childscriptcall_initialization) then -- Get some handles: activeVisionSensor=simGetObjectHandle('Vision_sensor') passiveVisionSensor=simGetObjectHandle('PassiveVision_sensor') -- Enable an image publisher and subscriber: pub=simExtRosInterface_advertise('/image', 'sensor_msgs/Image') --After calling this function, this publisher will treat uint8 arrays as string. Using strings should be in general much faster that using int arrays in Lua. simExtRosInterface_publisherTreatUInt8ArrayAsString(pub) -- treat uint8 arrays as strings (much faster, tables/arrays are kind of slow in Lua) sub=simExtRosInterface_subscribe('/image', 'sensor_msgs/Image', 'imageMessage_callback') simExtRosInterface_subscriberTreatUInt8ArrayAsString(sub) -- treat uint8 arrays as strings (much faster, tables/arrays are kind of slow in Lua)endif (sim_call_type==sim_childscriptcall_sensing) then -- Publish the image of the active vision sensor: local data,w,h=simGetVisionSensorCharImage(activeVisionSensor) d={} d['header']={seq=0,stamp=simExtRosInterface_getTime(), frame_id="a"} d['height']=h d['width']=w d['encoding']='rgb8' d['is_bigendian']=1 d['step']=w*3 d['data']=data simExtRosInterface_publish(pub,d)endif (sim_call_type==sim_childscriptcall_cleanup) then -- Shut down publisher and subscriber. Not really needed from a simulation script (automatic shutdown) simExtRosInterface_shutdownPublisher(pub) simExtRosInterface_shutdownSubscriber(sub)end 可以在终端中输入下面的命令来显示/image话题的图像:
$ rosrun image_view image_view image:=/image
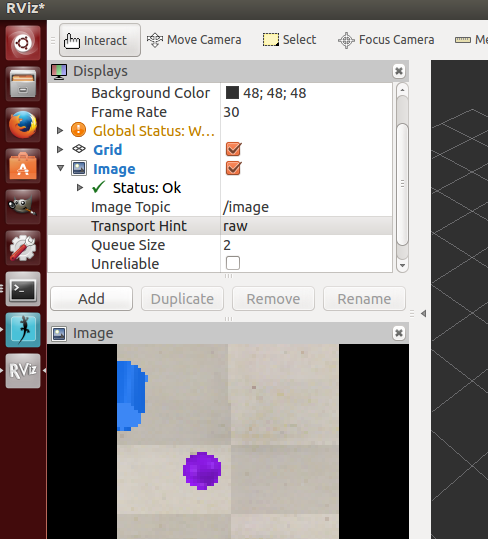
在rviz中添加Image,将话题选为/image也可以查看图像信息:
controlTypeExamples
还有一个例子是controlTypeExamples.ttt,V-rep中的脚本负责发布接近传感器的信息以及仿真时间并订阅左右轮驱动的话题。外部的ros程序rosBubbleRob2根据接收到的传感器信息生成左右轮速度指令,并发布出去,V-rep中订阅后在回调函数里控制左右轮关节转动。
V-rep中脚本代码如下:
function setLeftMotorVelocity_cb(msg) -- Left motor speed subscriber callback simSetJointTargetVelocity(leftMotor,msg.data)endfunction setRightMotorVelocity_cb(msg) -- Right motor speed subscriber callback simSetJointTargetVelocity(rightMotor,msg.data)endfunction getTransformStamped(objHandle,name,relTo,relToName) t=simGetSystemTime() p=simGetObjectPosition(objHandle,relTo) o=simGetObjectQuaternion(objHandle,relTo) return { header={ stamp=t, frame_id=relToName }, child_frame_id=name, transform={ translation={x=p[1],y=p[2],z=p[3]}, rotation={x=o[1],y=o[2],z=o[3],w=o[4]} } }endif (sim_call_type==sim_childscriptcall_initialization) then robotHandle=simGetObjectAssociatedWithScript(sim_handle_self) leftMotor=simGetObjectHandle("rosInterfaceControlledBubbleRobLeftMotor") -- Handle of the left motor rightMotor=simGetObjectHandle("rosInterfaceControlledBubbleRobRightMotor") -- Handle of the right motor noseSensor=simGetObjectHandle("rosInterfaceControlledBubbleRobSensingNose") -- Handle of the proximity sensor -- Check if the required ROS plugin is there: moduleName=0 moduleVersion=0 index=0 pluginNotFound=true while moduleName do moduleName,moduleVersion=simGetModuleName(index) if (moduleName=='RosInterface') then pluginNotFound=false end index=index+1 end -- Add a banner: if (pluginNotFound) then bannerText="I cannot run! (I couldn't find my RosInterface plugin)" else bannerText="I am controlled via a ROS node and the RosInterface! ('rosBubbleRob2' controlls me)" end black={ 0,0,0,0,0,0,0,0,0,0,0,0} red={ 0,0,0,0,0,0,0,0,0,1,0.2,0.2} simAddBanner(bannerText,0,sim_banner_bitmapfont+sim_banner_overlay,nil,simGetObjectAssociatedWithScript(sim_handle_self),black,red) -- Ok now launch the ROS client application: if (not pluginNotFound) then local sysTime=simGetSystemTimeInMs(-1) local leftMotorTopicName='leftMotorSpeed'..sysTime -- we add a random component so that we can have several instances of this robot running local rightMotorTopicName='rightMotorSpeed'..sysTime -- we add a random component so that we can have several instances of this robot running local sensorTopicName='sensorTrigger'..sysTime -- we add a random component so that we can have several instances of this robot running local simulationTimeTopicName='simTime'..sysTime -- we add a random component so that we can have several instances of this robot running -- Prepare the sensor publisher and the motor speed subscribers: sensorPub=simExtRosInterface_advertise('/'..sensorTopicName,'std_msgs/Bool') simTimePub=simExtRosInterface_advertise('/'..simulationTimeTopicName,'std_msgs/Float32') leftMotorSub=simExtRosInterface_subscribe('/'..leftMotorTopicName,'std_msgs/Float32','setLeftMotorVelocity_cb') rightMotorSub=simExtRosInterface_subscribe('/'..rightMotorTopicName,'std_msgs/Float32','setRightMotorVelocity_cb') -- Now we start the client application: result=simLaunchExecutable('rosBubbleRob2',leftMotorTopicName.." "..rightMotorTopicName.." "..sensorTopicName.." "..simulationTimeTopicName,0) endendif (sim_call_type==sim_childscriptcall_actuation) then -- Send an updated sensor and simulation time message, and send the transform of the robot: if not pluginNotFound then local result=simReadProximitySensor(noseSensor) local detectionTrigger={} detectionTrigger['data']=result>0 simExtRosInterface_publish(sensorPub,detectionTrigger) simExtRosInterface_publish(simTimePub,{data=simGetSimulationTime()}) -- Send the robot's transform: simExtRosInterface_sendTransform(getTransformStamped(robotHandle,'rosInterfaceControlledBubbleRob',-1,'world')) -- To send several transforms at once, use simExtRosInterface_sendTransforms instead endendif (sim_call_type==sim_childscriptcall_cleanup) then if not pluginNotFound then -- Following not really needed in a simulation script (i.e. automatically shut down at simulation end): simExtRosInterface_shutdownPublisher(sensorPub) simExtRosInterface_shutdownSubscriber(leftMotorSub) simExtRosInterface_shutdownSubscriber(rightMotorSub) endend
rosInterface helper tool
在模型浏览器的tools文件夹中有一个RosInterface的帮助工具,将其拖入场景中可以方便实现一些控制功能。
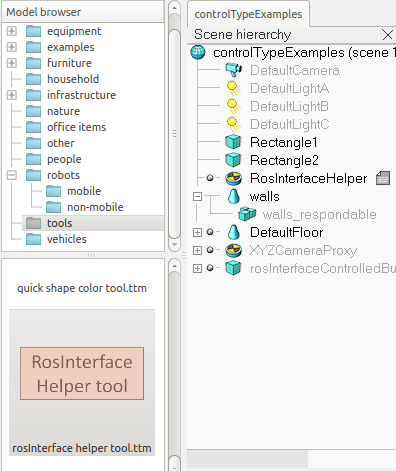
主要有下面一些功能:
- startSimulation topic: can be used to start a simulation by publishing on this topic a std_msgs::Bool message.
- pauseSimulation topic: can be used to pause a simulation by publishing on this topic a std_msgs::Bool message.
- stopSimulation topic: can be used to stop a simulation by publishing on this topic a std_msgs::Bool message.
- enableSyncMode topic: by publishing a std_msgs::Bool message on this topic, you can enable/disable the synchronous simulation mode.
- triggerNextStep topic: by publishing a std_msgs::Bool message on this topic, you can trigger the next simulation step, while in the synchronous simulation mode.
- simulationStepDone topic: a message of type std_msgs::Bool will be published at the end of each simulation pass.
- simulationState topic: messages of type std_msgs::Int32 will be published on a regular basis. 0 indicates that the simulation is stopped, 1 that it is running and 2 that it is paused.
- simulationTime topic: messages of type std_msgs::Float32 will be published on a regular basis, indicating the current simulation time.
可以在终端中输入下面的一些命令进行测试:
$ rostopic pub /startSimulation std_msgs/Bool true --once$ rostopic pub /pauseSimulation std_msgs/Bool true --once$ rostopic pub /stopSimulation std_msgs/Bool true --once$ rostopic pub /enableSyncMode std_msgs/Bool true --once$ rostopic pub /triggerNextStep std_msgs/Bool true --once
比如在终端中输入:rostopic pub /startSimulation std_msgs/Bool true --once, 就可以开始仿真,跟手动点击仿真按钮效果一样。
参考:
转载地址:http://ftbab.baihongyu.com/